mercredi 3 août 2016

Turbocad - LTE IU - Ligne de commande - Travaillez encore plus efficacement

An ENGLISH version of this post is available at this adress

L'interface utilisateur LTE avec la ligne de commande vous permet de travailler encore plus efficacement et rapidement !


La plupart des utilisateurs de TurboCAD utilisent son environnement par défaut, moi le premier :-) qui comprend menus déroulants intuitifs, des barres d'outils avec des icones intuitives qui offrent une utilisation visuelle confortable et agréable. Mais il y a une autre méthode de travail efficace, sinon plus encore, les utilisateurs Autocad la connaisse très bien et c'est la Ligne de commande (Command line)


TurboCAD
offre la possibilité de travailler en utilisant les commandes au clavier pour améliorer considérablement votre efficacité à travailler avec le duo souris-clavier. Cette méthode est obtenue en utilisant l'interface utilisateur LTE fourni dans votre logiciel qui inclus la ligne de commande (Command line). Ce tutoriel va vous montrer comment accéder et utiliser cette interface


Allons-y pour la configuration de l'interface utilisateur LTE dans Turbocad !


Tout d'abord, pour changer l'interface utilisateur par défaut de Turbocad pour l'interface utilisateur (UI) LTE allez dans le menu Tools et sélectionnez Customize


Dans la fenêtre Customize, allez dans l'onglet Options, puis dans «Workspace" et sélectionnez LTE Workspace dans le menu déroulant Default Style. Cliquez sur le bouton Close en bas de la fenêtre. Turbocad prend quelques instants pour initialiser l'interface utilisateur LTE


Vous êtes maintenant dans l'interface utilisateur LTE et vous pouvez voir la zone de Ligne de commande au bas de la fenêtre Turbocad. Vous êtes maintenant prêt à utiliser cet outil puissant!


Commençons maintenant à utiliser la Ligne de commande


Nous allons utiliser quelques notions de base des commandes comme Line (ligne), Circle (cercle) et Rectangle, mais cette interface ne se limite pas à ces commandes, vous pouvez utiliser des centaines de commandes 2D/3D utilisées dans Autocad et certaines plus spécifiques à Turbocad

** Pour les utilisateurs Autocad, il y a une version plus spécifique de TurboCAD pour vous. Cette version est appelée Turbocad LTE Pro et elle est spécialement conçue pour faciliter votre transition vers TurboCAD. Vous pouvez enregistrer vos dessins directement dans le type de fichier DWG et d'autres formats incluant bien sûr celui  de Turbocad. Vous pouvez en apprendre plus sur cette version en cliquant ICI

** Ce tutoriel en est un en cours de réalisation, s'il vous plaît venez le visiter régulièrement :-)

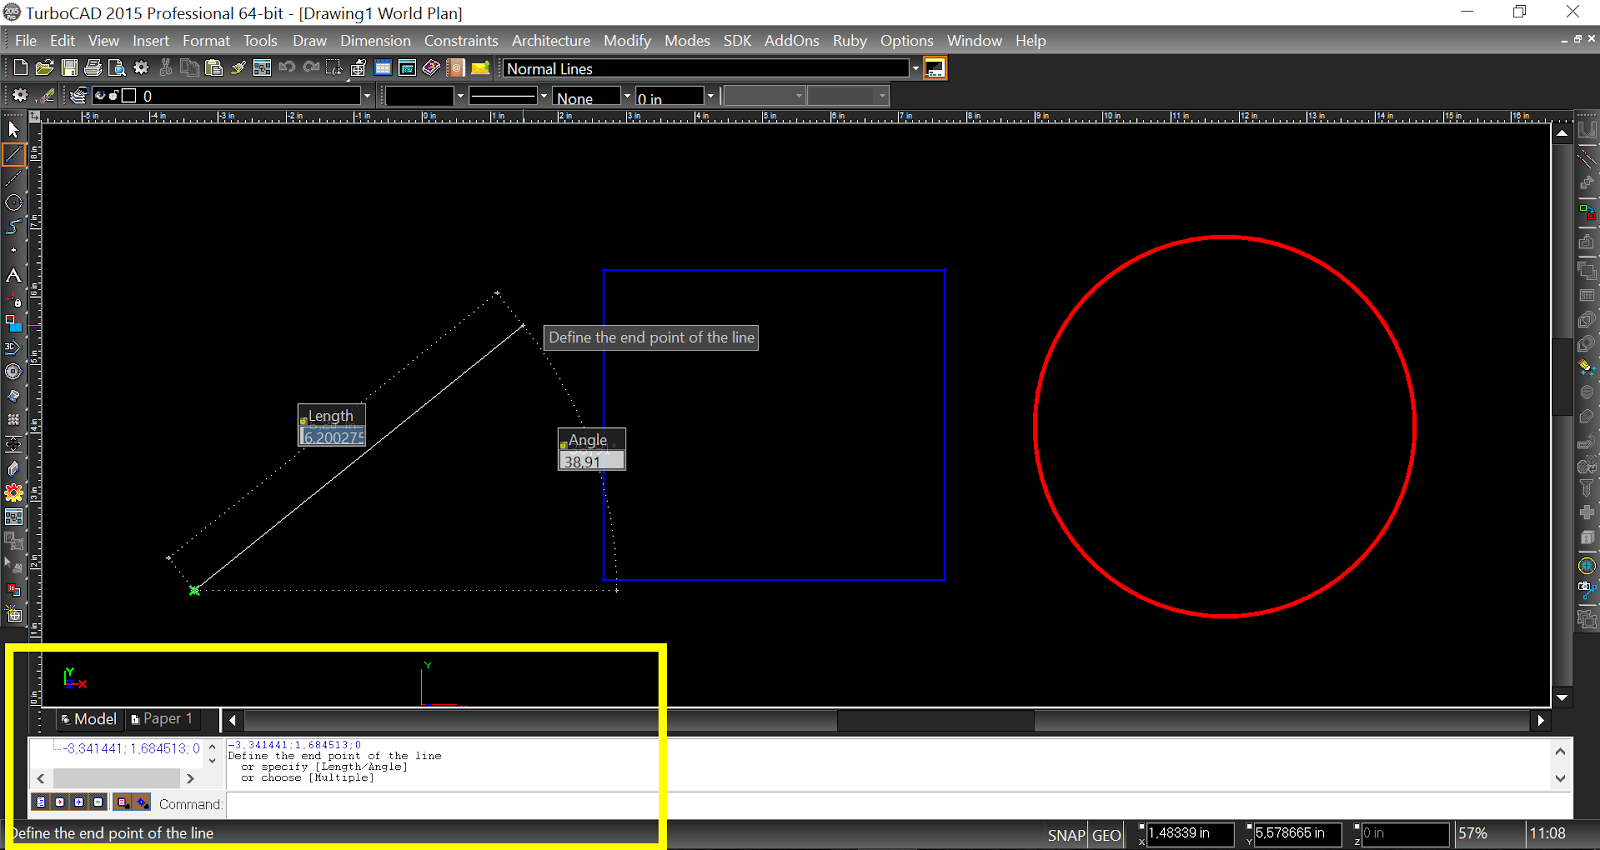
Dans cet exemple, nous allons tracer une ligne de 5 pouces de long avec un angle de 30 degrés. Premièrement tapez dans la boîte Ligne de commande, située au bas de la fenêtre, la lettre "L" pour ligne et appuyez sur Entrée ou sur la Barre d'espacement. Vous pouvez utiliser le système métrique en écrivant mm (exemple) juste après la nouvelle valeur numérique saisie ou modifier le système d'unités du dessin. Pour ce faire allez dans le menu Options -> Drawing setup -> Space units -> System -> Metric


La Ligne de commande vous demande de définir le point de départ de la ligne (Start point) . Si vous déplacez le curseur dans la zone de dessin, il demande la même chose


Définir une position quelconque de la zone de dessin. Maintenant, deux nouvelles boîtes apparaissent dans la zone de dessin. Elles vous demandent de définir la position finale de la ligne (End point). Nous allons utiliser les deux cases pour définir précisément la longueur et l'angle que nous voulons. Par défaut, la case Lenght (longueur) est en surbrillance et attend que vous entriez une valeur. Entrez 5 dans cette case. Appuyez sur la touche Tab pour entrer la valeur d'angle 30 puis appuyez sur la Barre d'espacement ou sur la touche Entrée. Félicitations vous venez de dessiner votre premier objet dans ce nouvel environnement :-)


Vous pouvez observer que TurboCAD vous demande d'entrer de nouvelles valeurs à partir du point final que vous venez d'entrer. Il les demande parce que vous êtes toujours dans la commande Line jusqu'à ce que vous la quittiez en appuyant sur la touche Echap. De cette façon, vous pouvez dessiner de multiples lignes toujours à partir du dernier point de fin (End point) comme une Polyligne sans en être une

** Lorsque vous utilisez l'interface de Ligne de commande, regardez dans celle-ci et vous pouvez choisir différentes options en fonction de l'outil que vous utilisez. Je vais écrire sur ce sujet plus tard

Deuxième exemple, nous allons dessiner un rectangle avec la même procédure. Premièrement entrer la commande REC et appuyez sur la Barre d'espacement ou la touche Entrée. TurboCAD vous demandant de définir le premier coin de la boîte. Faites-le en cliquant dans la zone de dessin


Maintenant Turbocad vous demande de définir le deuxième coin de la boîte. Deux boîtes apparaissent dans la zone, Size A (longueur) et Size B (hauteur) pour définir la taille de la boîte. Dans ce cas ci, nous allons utiliser 6 comme étant la longueur (Size A) et 3 à la hauteur (Size B). Par défaut, la case Size A est en surbrillance, alors entrez 6 comme valeur de longueur (Size A), appuyez sur la touche de tabulation (Tab) pour entrer dans la zone Size B et entrez 3 comme valeur de la hauteur, puis appuyez sur la Barre d'espacement ou la touche Entrée pour confirmer la commande. Voilà, c'est facile et rapide comme ça et ça va être de plus en plus rapide au fur et à mesure que vous l'utiliserez !


** Lorsque vous utilisez l'interface de ligne de commande, regardez dans celle-ci et vous pouvez choisir différentes options en fonction de l'outil que vous utilisez. Je vais écrire sur ce sujet plus tard

Troisième exemple, nous allons dessiner un cercle avec la même procédure. Premièrement la commande "C" pour Circle (cercle) et appuyez sur la Barre d'espacement ou sur la touche Entrée. TurboCAD vous demande de définir le point centre du cercle. Faites-le en cliquant dans la zone de dessin


TurboCAD demande ensuite de définir un point qui déterminera le rayon du cercle. Dans ce cas ci, nous allons entrer une valeur dans la nouvelle boîte qui apparaît "Radius". Entrez 3 pour le rayon du cercle et appuyez sur la Barre d'espacement ou sur la touche Entrée pour confirmer la commande . Voilà une autre façon de dessiner un cercle dans TurboCAD. Au lieu d'une valeur numérique, vous pouvez bien sûr utiliser le curseur pour déterminer une valeur arbitraire.


** Lorsque vous utilisez l'interface de ligne de commande, regardez dans celle-ci et vous pouvez choisir différentes options en fonction de l'outil que vous utilisez. Je vais écrire sur ce sujet plus tard


Autres commandes de base


  • PLINE pour dessiner une polyligne
  • ARC pour dessiner un arc
  • ZOOM pour augmenter ou diminuer la taille apparente des objets
Vous en voulez sûrement plus ? Cliquez sur ce lien pour plus de commandes à utiliser avec la Ligne de commande (Command Line)

**Comme mentionné plus haut ce tutoriel sera bonifié dans les prochaines semaines!


Je vous souhaite autant de plaisir que j'en ai à utiliser la Ligne de commande !


Vous voulez plus de tutoriels de Turbocadcliquez ici

Vous voulez en apprendre plus sur les différentes versions de Turbocad, suivez ce lien

Turbocad, l'Alternative. Suivez ce lien pour en faire l'expérience

Turbocad, the valid Alternative. Follow this link to experience it !​


Jean Bernier
Service de plans JB
Utilisateur et affilié Turbocad

TurboCAD - Une commande ne fonctionne pas correctement - Placez vos objets sur le plan de travail courant


An ENGLISH version of this post is available at this adress

Une commande Turbocad ne fonctionne pas ou fonctionne partiellement? Pensez à placer les objets concernés sur le même plan de travail (Workplane) !


Parfois, une commande ne fonctionne pas ou ne fonctionne que partiellement et vous vous demandez "j'utilise cette commande correctement, mais je n'obtiens pas le résultat souhaité. Quel est le problème?". Souvent, les objets que vous utilisez pour exécuter cette commande ne sont pas sur le plan de travail actuel (Workplane) pour différentes raisons

** Cette astuce peut être appliquer sur d'autres logiciels de DAO (CAD). Vous devez trouver les noms de commandes correspondants


Pour être sûr que vos objets (lignes, arcs, cercles, polylignes, etc ...) sont sur le plan de travail actuel (Workplane), procédez comme suit:


  • Sélectionnez les objets qui seront utilisés pour exécuter la commande que vous souhaitez utiliser
  • Allez dans le menu Modify et sélectionnez la Place on Workplane (Shift + Alt + W)
De cette façon, tous les objets sélectionnés seront placer sur le plan de travail actuel (Workplane) et dans la plupart des cas, la commande va fonctionner correctement :-)

** Si le problème persiste, allez voir ce post sur le forum Turbocad


Une illustration des objets placés sur différents plans de travail (Workplanes)

Sur la figure ci-dessous (vue du dessus), le rectangle bleu clair représente le plan de travail initial. Le cercle et la ligne semblent être placé sur cette surface horizontale, mais si nous les regardons sur une vue de côté ...


nous pouvons voir qu'ils sont placés sur deux autres plans de travail horizontals (WorkPlane). Ici, j'ai beaucoup exagéré la situation, mais si les objets dont vous avez besoin pour exécuter une commande ne sont pas placés exactement sur le WorkPlane courant, ceci est suffisant pour que la commande ne fonctionne pas ou ne fonctionne que partiellement


Une vue en perspective des mêmes objets sur leurs différents plan de travail


Pourquoi les objets ne sont pas créés sur le bon plan de travail?


  • Il peut être causé par une erreur du logiciel
  • Cela peut être une mauvaise manipulation de votre part surtout en mode 3D ou ont change constamment de Plan de travail et que l'on oublie de vérifier le positionnement exact de notre plan de construction avant de créer un objet
  • Cela peut être causé lorsque vous effectuez une copie miroir ou lorsque vous changez l'angle de rotation d'un objet

Il y a probablement d'autres raisons qui me sont inconnues pour le moment. Si vous en connaissez d'autres, je vous serais reconnaissant de les partagez !

Cet article en est un travail en cours. Alors revenez souvent ou ajouter cette page à vos favoris :-)

Besoin de plus d'aide sur Turbocad, visitez ma page d'archives!


Jean Bernier
Service de plans JB
Affilié Turbocad affiliate

Turbocad, l'Alternative. Suivez ce lien pour en faire l'expérience
Turbocad, the valid Alternative. Follow this link to experience it !​

mardi 2 août 2016

Turbocad - A command is not working properly - Think about Place on Workplane

La version en FRANÇAIS de ce tutoriel est disponible ici

A command does not work or work partially ? Think to place the objects concerned on the same plane !


Sometimes a command does not work or works only partially and you say "I run this command correctly, but I do not get the desired result. What's wrong ?". Often, the objects you're using to run this command are not on the current Workplane for differents reasons

**This tip may be apply on others CAD softwares. You have to find the corresponding commands names


To be sure your objects (lines, arcs, circle, plolylines, ect...) are on the current Workplane follow these steps :


  • Select the objects that will be used to run the command you want to use
  • Go to the Modify menu and select the Place on Workplane command  (Shift + Alt + W)


In this way, all the objects selected will be place on the current Workplane and in most cases the command will working correctly

** If the problem persist, go see this post on the Turbocad forum http://forums.turbocad.com/index.php/topic,9797.0.html


An illustration of objects place on differents Workplanes


On the figure below, the light blue rectangle represent the original workplane. The circle and the line seems to be placed on this horizontal surface but if we look them from a side view...


we can see they're placed on two others horizontals Workplane. Here I have greatly exaggerated the situation, but if the objects that you need to execute a command are not placed exactly on the current WorkPlane This is sufficient for the command does not run or runs only partially


A perspective view of the same objects on different WorkPlane


Why the objects don't be created on the good Workplane ?


  • It may be cause by a software error
  • This may be a mishandling on your part especially in 3D mode or have constantly changing Workplane and that we forget to verify the exact positioning of our Workplane before creating an object
  • It may be cause when you a Mirror copy or when you change the rotation angle of an object


There are probably other reasons that are unknown to me now. If you know of others, I would appreciate that you share them !

This post is a work in progress one. So come back to it often or add to your favorites :-)

Need more help about Turbocad, see my archives page !

Jean Bernier
Service de plans JB
Affilié Turbocad affiliate

Turbocad, l'Alternative. Suivez ce lien pour en faire l'expérience
Turbocad, the valid Alternative. Follow this link to experience it !​

dimanche 31 juillet 2016

Turbocad outil Trim - Couper multiples lignes en une seule action

An English version of this post is available in following this link

Comment couper de multiples lignes entre deux objets (lignes, courbes, polyligne, ect ...) dans Turbocad


J'ai rencontré ce problème en dessinant un agrandissement de chalet pour un client. J'étais bien sûr capable de couper une ligne à la fois avec l'outil Trim, mais je ne pouvais pas couper de nombreuses lignes à la fois comme changer la longueur de plusieurs lignes en une seule action avec l'outil multi Shrink / Extend ligne

Vous verrez dans ce tutoriel comment obtenir le résultat souhaité ! J'utilise l'édition Platinum de Turbocad mais vous pouvez aussi utilisez ce tutoriel avec les éditions Deluxe et Pro

Alors je me suis tourné vers la communauté d'aide de Turbocad pour  m'aider à résoudre ce problème et je ne l'ai pas regretté :-). Comme vous pouvez le voir dans ce post, plusieurs membres ont attaqué la tâche avec courtoisie et efficacité. Je vous invite à vous y joindre. Beaucoup de trucs et astuces sont disponibles et bien sûr de l'aide spécifique à vos besoins

Commençons à résoudre ce problème !

Tout d'abord aller dans le menu Modify et sélectionnez l'outil Trim. Si vous ne pouvez pas le voir, voir ci-dessous le chemin pour y accéder


Deuxième sélectionner en faisant glisser en bas à droite jusqu'en haut à gauche, les deux objets serviront de couteaux. Ensuite, cliquez sur le bouton Finish (Drapeau) ou faites un clic droit et sélectionnez Finish (Drapeau) ou la combinaison de touches Alt + F


Maintenant sélectionnez les lignes à couper


Voyez le résultat !


Trucs

Si ça ne fonctionne pas ou que partiellement, pensez à placer les lignes "Couteaux" et les lignes qui doivent être coupées sur le même plan de travail (Workplane). Pour ce faire, sélectionnez les deux types de lignes et allez dans le menu Modify et sélectionnez Place on Workplane (Shift+Alt+W)

Si vous ne pouvez pas voir l'outil Trim, allez dans le menu Tools, sélectionnez Customize, la boîte Customize s'ouvre. Allez à l'onglet Commands, défilez vers le bas la zone Commands jusqu'à ce que vous voyez l'outil Trim, sélectionnez-le et faites-le glisser dans une barre d'outils de l'interface utilisateur de Turbocad. Maintenant, vous pouvez exécuter ce tutoriel!


Vous voulez plus de tutoriels de Turbocadcliquez ici


Jean Bernier
Service de plans JB
Affilié Turbocad

Turbocad, l'Alternative. Suivez ce lien pour en faire l'expérience
Turbocad, the valid Alternative. Follow this link to experience it !

samedi 30 juillet 2016

Turbocad - LTE UI - Command line - Work more efficiently

La version en  FRANÇAIS de ce tutoriel est diaponible à cette adresse

LTE user inteface allowing you to work even more efficiently and quickly

Update 2017-04-21 --- Click on this link for a complete LTE command list 

Most Turbocad users use its default environment, me first :-) which includes intuitive drop-down menus and icons toolbars that provide a visual use just as intuitive tools. But there is another effective method if not more then Autocad users knows very well and that is the Command Line


Turbocad offers the opportunity to work using the keyboard controls to significantly improve your effectiveness working with the mouse-keyboard duo. This method is achieved by using the LTE user interface provided in your software that included the command line. This tutorial will show you how to access and use this UI


Let's get setup the LTE user interface in Turbocad !


First, to change the user interface from the default to the LTE UI go to the Tools menu and select Customize


In the Customize Window, go to the Options tab then in "Workspace area" and select LTE Workspace in the Default style drop-down menu. Click on the Close button at the bottom of the window. Turbocad takes few moments to intitiate the LTE user interface


You're now in the LTE UI and you can see the Command line box at the bottom of Turbocad window. You are ready to use this powerfull tool !


Let's get start using the Command Line


We will use some basics commands like Line, Circle and rectangle but this UI is not limited to these commands you can use hundreds 2D/3D commands used in Autocad and some spefific to Turbocad

**For Autocad users, there's a more specific version of Turbocad for you.  This version is called Turbocad LTE Pro and it is designed specially to facilitate your transition to Turbocad. You can save your drawings directly in DWG file like others Turbocad version. You can learn more about at this adress

** This tutorial is a Work in progress one, please come visit regularly :-)

In this example we will draw a line 5 inches long with an angle of 30 degrees. First type in Command line box the letter "L" and press Enter. You can use metric system by writing mm (example) right after the new numeric value you entered or changing Space units. To do this go to Options menu --> Drawing setup --> Space units --> System --> Metric


The command line ask you to Define the Start point of the line. When you point the cursor in the drawing area it is asking the same thing


Define a position anywhere in the drawing area. Now two new boxes appear in the drawing area. It is asking to define the End point of the line. We will use the two boxes to define precisly the lenght and angle we want. By default the Lenght box is highlight and waiting you enter a value. Enter 5 in this case. Press the Tab key to enter the angle value 30 then press the Space bar or Enter key. Congratulations you just draw your first object in this new environnement :-)


You can observe then Turbocad asking you for a next End point from the one you just drew. It's because you're still in Line command until you exit it by pressing the Escape key. In this way you can draw multiples Lines always from the last End point like a Polyline without being

**When you are using the Command line interface, look in this one and you can choose differents options depending on what the tool you are using. I will writing on this subject later

Second example we will draw a rectangle with the same procedure. First write REC and hit Space bar or Enter key. Turbocad asking you to Define the first corner of the box. Do it by clicking anywhere in the drawing area

Now Turbocad asking to define the second corner of the box. Two boxes appear in drawing area, Size A(lenght) and Size B (height) to define the sizes of the box. In this case we will use 6 as the lenght and 3 as the height. By default the Size A box is highlight, so enter 6 as the lenght value, press the Tab key to enter the Size B box and enter 3 as the height value then press Space bar or Enter key to confirm the command. That's it, it's easy and fast like this and it's gonna be faster as and extent of your use !


**When you are using the Command line interface, look in this one and you can choose differents options depending on what the tool you are using. I will writing on this subject later

Third example, we will draw a circle with the same procedure. First write "C" and hit Space bar or Enter key. Turbocad asking you to Define the center point of the circle. Do it by clicking anywhere in the drawing area

Turbocad asking to Define point to specify radius of circle. In this case we will enter a value in the new box appear "Radius". Enter 3 as the Radius of the circle and hit the Space bar or the Enter key to confirm the command. That's another way to draw a circle in Turbocad. Instead of a numeric values, you can of course use the cursor to determine a free value.


**When you are using the Command line interface, look in this one and you can choose differents options depending on what the tool you are using. I will writing on this subject later

Others basic commands

I'm letting you try others commands among others :

PLINE to draw a polyline
ARC to draw an arc
ZOOM to increase or decrease the apparent sizes of objects

You want more for sure, see this web page !

Snap modes are accessible by right clicking in a free space on the drawing area and choose Local snap and select the desired mode


As mentionned above this tutorial will be improve in next weeks !


Have fun with LTE UI !

Wants more Turbocad tutorials, go to this adress

You want to learn more about versions of Turbocad, follow this linK

Jean Bernier
Turbocad user and affiliate


mardi 26 juillet 2016

Turbocad Trim tool - Cut multiples lines in one action

How to cut multiples lines between two objetcs (line, curve, polyline, ect...) in Turbocad

Une version en français de cet article est disponible ICI

I met this problem by drawing a chalet expansion for a client. I was of course able to cut a line at a time with the Trim tool, but I could not cut off many lines at a time like changing the length of several lines in one action with the tool Multi Shrink / Extend line


You will see in this tutorial how to achieve the desired result! I'm using Turbocad Platinum edition but you use this tutorial for the Deluxe and Pro edition too

So I turned to the Turbocad aid community to help me solve this problem and I have not regretted :-). As you can see in this post, several members attacked the task efficiently and courteously. I invit you to join it. A lot of tips and tricks are available and of course spefific help from the community

Let's get start to solve the problem !


First go to the Modify menu and select the Trim tool. If you can't see it, see the tip below


Second select by draging (buttom right to up left) the two objects will serve as Cutters (knifes). Then click on the Finish (Flag) button or right click ans select Finish or the key combination Alt+F


Now select by dragging the lines to be Trim


And see the Result !


Tips


If it dosesn't work or just partially, think to place the Cutters lines and lines to be Trim on the same Workplane. To do this, select the both types of lines and go to the Modify menu ans select Place on the WorkPlane

If you can't see the Trim tool in Modify menu, go to the Tools menu, select Customize the Customize box open. Go to Commands tab, scroll down in the Commands box til to see the Trim tool, select it and drag it any toolbar on the Turbocad user interface. Now you can execute this tutorial !

Wants more Turbocad tutorials, go to this adress

Thanks


Thank you to the members of the Turbocad forum. A special thanks to Torfinn who give us this tip

Have a great day

Jean Bernier
Service de plans JB
Turbocad, l'Alternative. Suivez ce lien pour en faire l'expérience
Turbocad, the valid Alternative. Follow this link to experience it !

dimanche 24 juillet 2016

Turbocad - Multi Shrink / Extend line is not working properly

Multi Shrink / Extend line is not working or only partially ?

If you happen to select multiple lines you want to extend to a target object ( line, curve , polyline , ect ... ) and that any or all of these lines do not extend themselves as you wish, then this tutorial is for you. It aims to fix this

Une version en FRANÇAIS de cet article est disponible à cette adresse


The software that I use for this tutorial is Turbocad in its 2015 version, but the solution can be applied equally well in other CAD software


 So let's get started !

You may notice that the command will not work in whole or in part before his final run when you select the lines  to be extend . Then you notice that one or more lines have no end point


First deselect all the objects there select


To fix this we will put all the objects that will be used on the same WorkPlane. Now select the lines you want to lenghten and the target object, for this tutorial will be the " target Rectangle" , which will limit lines lengthen


 Then for Turbocad users, go to the Modify menu and click on the command Place on WorkPlane (Shift + Alt + W). If you are using another CAD software , find the command that put the objects on your current work plan


Uncheck select lines and other objects
 

Repeat the command Multi Shrink / Extend line , select the lines to extend and complete the order by clicking on the object that will limit these same lines


Voilà ! you just solve your problem ! In rare cases it may be that you have to repeat this process a second time


What could cause such a problem?

This can be a mistake object manipulation at creation , moving objects on different  WorkPlane or running a software error


If you have other causes and want to share them with the community please forward them to me or add a comment to this article

Wants more Turbocad tutorials, go to this adress


Thank you for your visit and good day!

Jean