Inserting a door into a wall is good, but a door with a window is better!
You have seen in the tutorial on the tool "Door" of Turbocad, available at this address, how to insert a door in a wall create with the tool "Wall". In this tutorial you will see how to create a glazing with tiling in a door created with the Door tool.
 For the purpose of this tutorial, you can download the basic walls to these addresses:
Version 2014 and ulterior
Version 2015 and ulterior
Note: The Door tool is available on the Turbocad Deluxe, Turbocad Professional and Turbocad Pro Platinum versions. These 3 versions are available in free trial version and fully functional for 30 days :-) Click on the links in blue to learn more
Before going further you will enter the basic values of the door are its dimensions and its vertical position with respect to the floor. Right click on the Door tool icon, the Properties window opens

Enter the following values in the corresponding fields:
Here I will give you the main steps to follow to create it, you can refer to my tutorial "Turbocad - the tool Door - Really powerful" to get the complete steps to create it
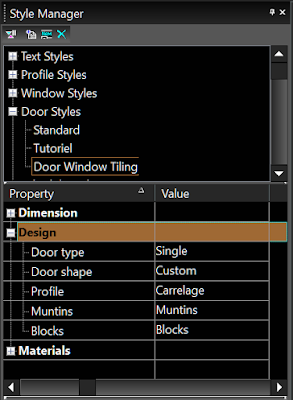
Go to the Style Manager, expand the Door styles item and select Standard. Then click the Create new style icon in the icon bar under Style manager

The New style name window appears, enter a name for your new door. For the needs of the tutorial I will use Door Window Tiling

Now under Door Styles, click once on your new door name
Further down in the Style Manager window you will find the Dimension item, expand it.

Enter the following values in the corresponding fields
Now expand item
Save the fruit of your work by clicking on the Apply Style Changes icon

Now expand the item Materials, The only item you'll change here is the Glass material

Click in the right field (Value) of Glass material, the Materials window opens. Enter the values corresponding to those in the image below

Click OK and save the fruit of your work by clicking on the Apply Style Changes icon
Your door style is now created!
Note: The Door tool is available on the Turbocad Deluxe, Turbocad Professional and Turbocad Pro Platinum versions. These 3 versions are available in free trial version and fully functional for 30 days :-) Click on the links in blue to learn more
Now let's get to the heart of the matter either the glazing and the tiling that you will include in the door
Still in Style Manager, return to the Design item and click in the box to the right (Value) of Muntin, The Muntin window opens. This is where we will define the dimensions of the material that will make up the tile

Click the Add button, the Muntins block window opens, Enter the following values:

The other items in this window are not included in this tutorial
Click OK.
We will now create a Profile for our window
In the Style manager, click Profile Styles once and click the Create a new style button. The New Style Name window appears, enter Tile as the name and click the OK button

A blank page in Isometric view appears in the drawing space. Select the Rectangle tool, click in the drawing space and move the cursor so that a rectangle begins to be drawn as shown in the illustration below. Enter the following dimensions for this rectangle that represents your door:

Cases located at the bottom left of the Turbocad window. Size A: 84 inches (2134mm) and Size B: 34 inches (864mm)
Press Enter. Use Zoom extents (Ctrl + Backspace) to see the entire rectangle
Draw a second rectangle in the same way with the following dimensions for that other rectangle that represents your glazing:
Size A: 72 inches (1829mm) and Size B: 22 inches (559mm)
Press Enter. Use Zoom extents (Ctrl + Backspace) to see all rectangles
Now select the small rectangle and place it so that it is perfectly centered in the largest. You can use Snap Mode Middle Point and Intersection tools, Show magnetic point tool, Extended Ortho and Appearent intersection See image below


Select the two rectangles, go to the Modify menu and click Place on Workplane (Shift + Alt + W)

Select the Edit Boundary Profiles tool from the Architecture - Profiles - Edit Boundary Profiles drop-down menu and select the largest rectangle, right click and click Finish

Select the Edit Hole Profiles tool from the Architecture - Profiles - Edit Hole Profiles drop-down menu and select the smallest rectangle, right click and click Finish


You are now ready to insert your new doors with the Door tool :-). Select it and move your cursor and see a buddy move with dimensions at the bottom of it. They represent the distances between the end of walls and the sides of your door, in order to facilitate its location. Click where you want to place it.
Note: you can move on any walls create

Congratulations you have successfully completed the tutorial!
Note: The Door tool is available on the Turbocad Deluxe, Turbocad Professional and Turbocad Pro Platinum versions. These 3 versions are available in free trial version and fully functional for 30 days :-) Click on the links in blue to learn more
Want more Turbocad tutorials, click here
Jean
Turbocad affiliate
To be complete, come later :-)

Version 2014 and ulterior
Version 2015 and ulterior
Note: The Door tool is available on the Turbocad Deluxe, Turbocad Professional and Turbocad Pro Platinum versions. These 3 versions are available in free trial version and fully functional for 30 days :-) Click on the links in blue to learn more
Create the Door
Before going further you will enter the basic values of the door are its dimensions and its vertical position with respect to the floor. Right click on the Door tool icon, the Properties window opens

Enter the following values in the corresponding fields:
- Width: Enter your door width. For the purpose of the tutorial enter 34 "(864mm)
- Height: Enter your door height. For the purpose of the tutorial enter 7 feet (2134mm)
- Outside of frame or Inside of frame: Choose here whether the width and height of the door is defined on the outside or inside the frame
- Vertical alignment: Select Head of object
- Head height: Enter here at what height, relative to the bottom of the wall, the head of the window will be located. For the purpose of the tutorial enter 7 feet (2134mm)
Here I will give you the main steps to follow to create it, you can refer to my tutorial "Turbocad - the tool Door - Really powerful" to get the complete steps to create it
Go to the Style Manager, expand the Door styles item and select Standard. Then click the Create new style icon in the icon bar under Style manager

The New style name window appears, enter a name for your new door. For the needs of the tutorial I will use Door Window Tiling

Now under Door Styles, click once on your new door name
Further down in the Style Manager window you will find the Dimension item, expand it.

Enter the following values in the corresponding fields
- Frame width, enter 2 "or 50mm
- Frame depth, enter 14 "or 356mm for this tutorial. Make sure that this value is slightly greater than the thickness of your wall otherwise your door will not be visible in renderings Quality render and Advanced Render The reason being that your window will be inserted in the center of the wall
- Stop width, enter 1 "or 25mm
- Stop depth, enter 2 "or 50mm
- Door thickness: Enter 1 3/4 "(44mm)
- Glass thickness, for the purpose of this tutorial enter 1/8 "(3mm)
- Auto adjust to width of wall *** do not check this option because it does not work well on one of the versions of Turbocad and I do not remember which one
Now expand item

- Door type: For the purposes of this tutorial choose Single by clicking in the box next to it (Value column). Turbocad offers you a choice, have fun trying them out :-)
- Door shape: For the purposes of this tutorial choose Rectangular by clicking in the box next to it (Value column). Several other forms are also offered to you to try them!
- Profile: The Profile is used when you create your profile for the insertion of your glazing. Do not select Profile, we'll go back later in this tutorial
- Muntins: You will use this option to include your tile. Leave this field as we will go back later in this tutorial
- Blocks: Offers the possibility to integrate an already created block. This option is not included in this tutorial.
Save the fruit of your work by clicking on the Apply Style Changes icon

Now expand the item Materials, The only item you'll change here is the Glass material

Click in the right field (Value) of Glass material, the Materials window opens. Enter the values corresponding to those in the image below

Click OK and save the fruit of your work by clicking on the Apply Style Changes icon
Your door style is now created!
Note: The Door tool is available on the Turbocad Deluxe, Turbocad Professional and Turbocad Pro Platinum versions. These 3 versions are available in free trial version and fully functional for 30 days :-) Click on the links in blue to learn more
Create window and tiling
Now let's get to the heart of the matter either the glazing and the tiling that you will include in the door
Still in Style Manager, return to the Design item and click in the box to the right (Value) of Muntin, The Muntin window opens. This is where we will define the dimensions of the material that will make up the tile

Click the Add button, the Muntins block window opens, Enter the following values:

- Name : for the purposes of this tutorial I will use Tile
- Glass component: Select All if you have not already done so. As for the Single option, I have not experienced it yet
- Muntin : width will be 1/2 "(13mm), Depth (depth): will be 1/2" (13mm)
- Lights: Pattern for this tutorial will be Rectangular Lights high: for the purposes of this tutorial it will be 6, Lights wide for the purposes of this tutorial. Will be 5
The other items in this window are not included in this tutorial
Click OK.
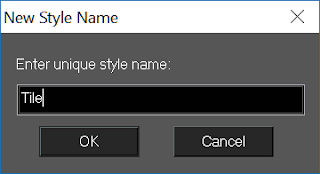
We will now create a Profile for our window
In the Style manager, click Profile Styles once and click the Create a new style button. The New Style Name window appears, enter Tile as the name and click the OK button


A blank page in Isometric view appears in the drawing space. Select the Rectangle tool, click in the drawing space and move the cursor so that a rectangle begins to be drawn as shown in the illustration below. Enter the following dimensions for this rectangle that represents your door:

Cases located at the bottom left of the Turbocad window. Size A: 84 inches (2134mm) and Size B: 34 inches (864mm)
Press Enter. Use Zoom extents (Ctrl + Backspace) to see the entire rectangle
Draw a second rectangle in the same way with the following dimensions for that other rectangle that represents your glazing:
Size A: 72 inches (1829mm) and Size B: 22 inches (559mm)
Press Enter. Use Zoom extents (Ctrl + Backspace) to see all rectangles
Now select the small rectangle and place it so that it is perfectly centered in the largest. You can use Snap Mode Middle Point and Intersection tools, Show magnetic point tool, Extended Ortho and Appearent intersection See image below


Select the two rectangles, go to the Modify menu and click Place on Workplane (Shift + Alt + W)

Select the Edit Boundary Profiles tool from the Architecture - Profiles - Edit Boundary Profiles drop-down menu and select the largest rectangle, right click and click Finish

Select the Edit Hole Profiles tool from the Architecture - Profiles - Edit Hole Profiles drop-down menu and select the smallest rectangle, right click and click Finish

To complete the Profile you have two choices, if you have the validation button represented by a pink hook at the top of the Style Manager window, click on it. If not, use the selection tool to select the two rectangles, right click and select Finish Block / group Editing completely at the bottom of the menu (scroll down with the small arrow at the bottom of the menu)

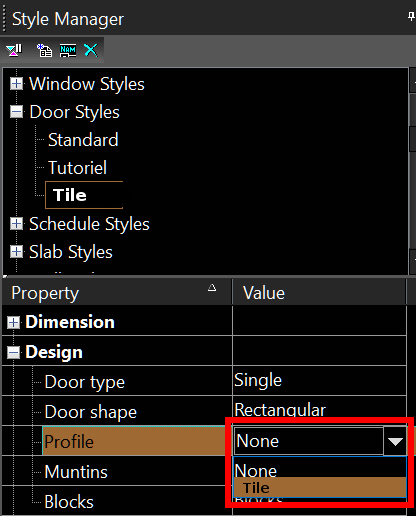
You return to the isometric view of the walls in 3D, return to the Style Manager and expand the Door Styles, choose the Tile style, then expand the Design section. Click in the box next to Profile and choose item Tile
Now right click on the Door tool and select Properties and go to General. At the bottom of this window, go to the Door Styles sub-section and click its drop-down menu and choose the door style you just created and click the OK button

You are now ready to insert your new doors with the Door tool :-). Select it and move your cursor and see a buddy move with dimensions at the bottom of it. They represent the distances between the end of walls and the sides of your door, in order to facilitate its location. Click where you want to place it.
Note: you can move on any walls create

Congratulations you have successfully completed the tutorial!
Note: The Door tool is available on the Turbocad Deluxe, Turbocad Professional and Turbocad Pro Platinum versions. These 3 versions are available in free trial version and fully functional for 30 days :-) Click on the links in blue to learn more
Jean
Turbocad affiliate
To be complete, come later :-)