Aucun message portant le libellé workplane. Afficher tous les messages

mercredi 26 avril 2017

Turbocad - How to create Curtains - Loft tool and Spline by Fit Points

How to create Curtains with the Loft tool and Spline by Fit Points of Turbocad


It's much less work than making them to the sewing machine!

To follow this tutorial you can download the basic Turbocad file by clicking this link. Open it

Note : The Revolve tool is available with the Professionnal and PRO Platinum versions of Turbocad.  These 2 versions are available in free trial and fully functional versions for 30 days :-) Click on the links in blue to learn more

You see just the basics objects and visuals Workplanes you'll need to do the curtains and the bands which holds them on the side. I placed others objects already did (pole, walls, moldings, door, ect...) on specific layers. Those layers are invisible. We'll make them visible during the tutorial


Procedure to create the curtains and the bands

  • First I maded 3 horizontals Workplanes (top, middle, bottom)
  • Creation of the horizontals shapes of the curtains with Spline by fit Points tool
  • Creation of the curtains with the Loft tool
  • Creation of the bands which hold the curtains on the side

Creation of the necessary Workplanes

In this Curtains tutorial file,they're already maded. You can access them in using the Named Workplane by the Standard Toolbar or with the Design Director. It is easier to predetermine your Workplnes before to place differents curtains shapes at the right places. See the image above


Creation of the horizontals shapes of the curtains

As you can see on the image below, I did a rectangle on the Top Workplane at the place I want to start the left curtain. To help me, I used the Divide snap mode with an 18 divisions setup and I selected the Vertex snap mode too to start the curtain shape. Now select the Spline by Fit Point tool from the Curve toolbar. Start your curtain shape with one of the corner of the rectangle and after draw the shape you want for your curtain. 

On the current workplane, Made a copy of the curtain shape  and place it at the place you want, NOT A MIRROR COPY because it causes a display problem (transparencies parts on the curtains) and I don't know why. Rotate it if it's needed


Now make the Middle WorkPlane active. Select the 2 curtains shapes you just did, make a copy them and place them where you want on the Middle Workplane

Select the left curtain shape (middle one) and resize it as you wish and do the same thing with the right one


Repeat the previous steps but on the Bottom WorkPlane


Creation of the curtains with the Loft tool

You are now at the most interesting moment !

Before to select the Loft tool, Right click and select Properties, in the 3D sub section make sure Solid is selected

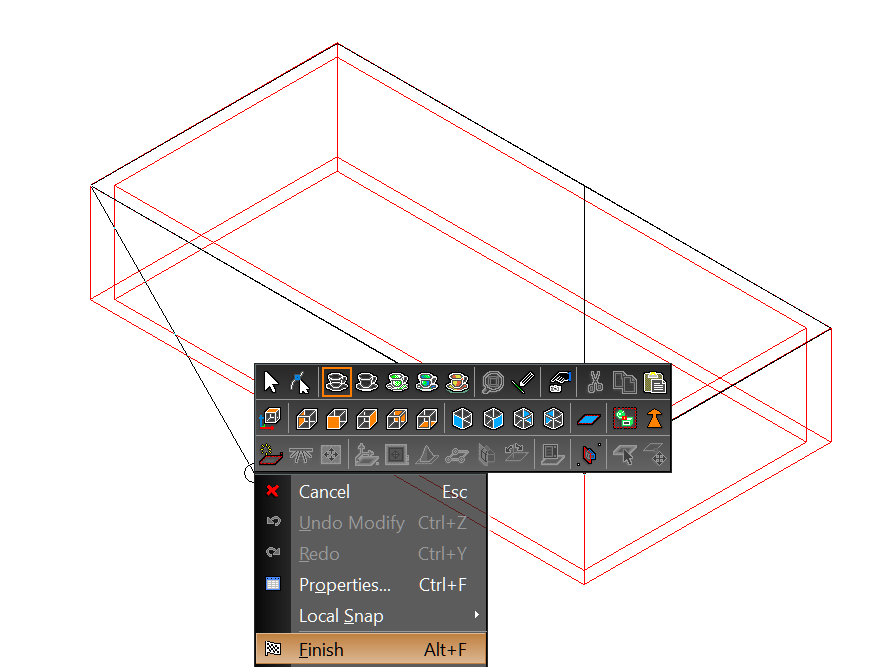
Now select the Loft tool. After select the 3 formats of curtains shapes in this way to reproduce the curtains I did (you can try other ways to make other results) : the top one, the middle one and the bottom one. Right click and select the Finish command.


Voilà, congratulations you succeed your first Lofting. To see the render, choose the Render scene you want (Draft, Quality or Advanced Quality)


Now use the same procedure po made the right curtain. If you to see the result with the pole, walls and others objects you just have to turn on the appropriates layers

Note : The Revolve tool is available with the Professionnal and PRO Platinum versions of Turbocad.  These 2 versions are available in free trial and fully functional versions for 30 days :-) Click on the links in blue to learn more

Want more Turbocad tutorialsclick here

vendredi 24 février 2017

Turbocad - Roofs - Simple roof

La version en FRANÇAIS de cet article est disponible à cette adresse

Simple 3D Roof with Turbocad


Rather than drawing the roof of your building manually, Turbocad offers you to automate this task for you with its tool "Roof" with amazing results. Now let's see how to use it !


note : The Roof tool is available on the Turbocad Deluxe, Turbocad Professional and Turbocad Pro Platinum versions. These 3 versions are available in free trial version and fully functional for 30 days :-). Click on the blue links to learn about

Steps to follow to make this roof in 3D


In this tutorial we will use a piece measuring 40 feet (12192mm) length X 20 feet (6096mm) deep X 8 feet (2438mm) height with a wall thickness of 12 inches (305mm). You can use any other room size if you wish. I added a tutorial at the bottom of this page to build these walls in 3D


First of all we must determine the horizontal plane (Workplane) on which we will deposit the lower part (seated) of our roof. To do this, select the Workplane - By facet tool by pressing the Major (up arrow) + Alt + F keys simultaneously. You can also select it by pressing the icon of the Workplane toolbox In the Turbocad toolbar note : put your walls with a different color other than black in order to differentiate them from the roof that we will make lower


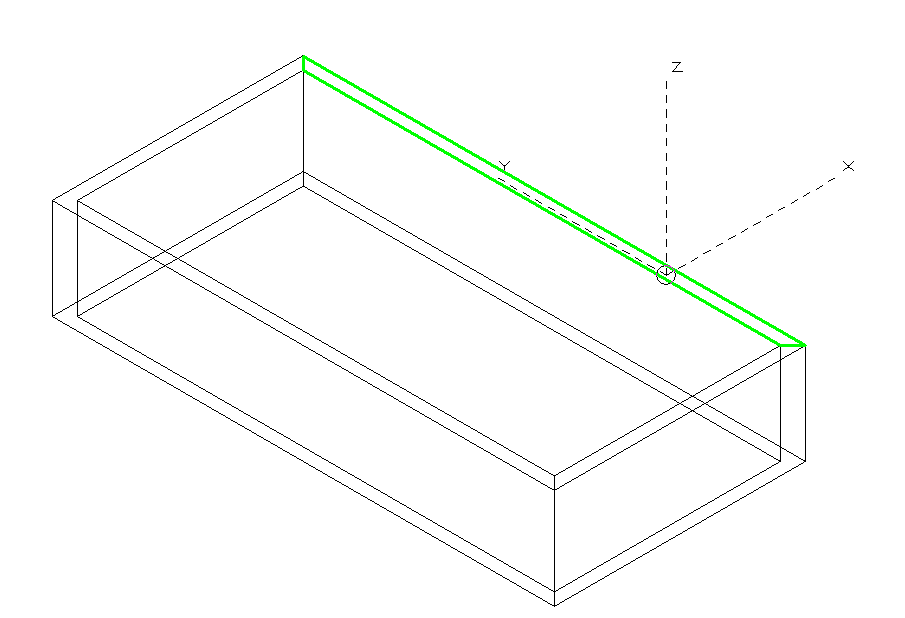
Moving your cursor over the top of one of the walls, a highlighted green line appears above the wall. Left click.


You are now on the right workplane. To ensure this, return to the Workplane toolbox and press the Show / Hide WorkPlane icon. A red dotted square appears to give you the orientation of the workplane


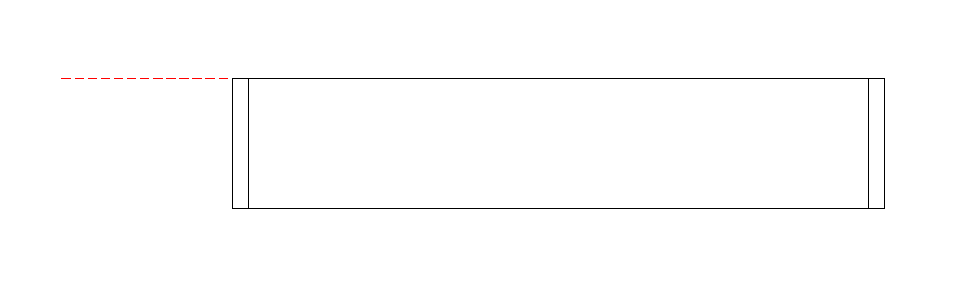
Select the front view and you see this same red line but this time horizontally and located on the top of the walls


Return to an isometric view. Now select the Roof tool from the drop-down menu
Architecture -- Roofs -- Add Roof


Now make sure the Vertex Snap mode is active and click the 4 top outer corners of your room. Once the fourth corner has been clicked, right click and select the Finish command (Alt + F)


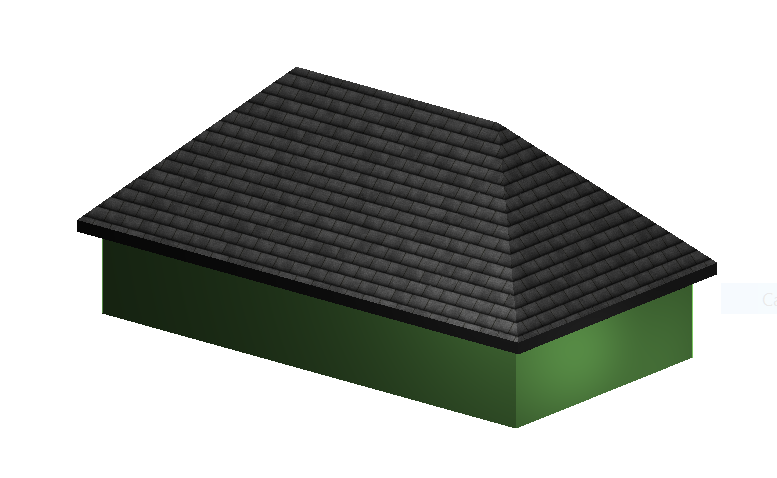
Change the viewing angle of your building so that you can see it clearly Congratulations you have just created your first roof in 3D with the Add Roof tool of Turbocad !


note : The Roof tool is available on the Turbocad Deluxe, Turbocad Professional and Turbocad Pro Platinum versions. These 3 versions are available in free trial version and fully functional for 30 days :-). Click on the blue links to learn more about


Now go further by changing the angles of the slopes, add a roof overhang and a fascia


Edit and add items to the roof


We will now add volume to the roof by adding a roof overhang of 16 inches (406mm). Select the roof, right click on it, the Properties window appear and go to Roof category


In the Overhang box, enter 16 "or 406 if you are in the metric system and click OK.


Roof slope

To change the slope of the roof, select the roof and right click on it, the Properties window appear. Select Roof in the left box of the window. In the Slope box, for example, enter the value 30 for 30 degrees. Click OK to view the result


Fascia

Add a thickness to the slopes of the roof, which will be an 8 inch (200mm) fascia. Select the roof, right click on it, the Properties window appear. Then go to the Roof category.


In the Thickness box, enter 8 "or 200 if you are in the metric system and click OK. You will see the fascia appear by the thickness you have just added to the roof

To change the color of the fascia, select the roof and the color like any other object with the color tool on the top of the Turbocad window


Roof covering

Our roof is a bit dull, let's add it a texture of asphalt shingles. Select the roof, right click on it, the Properties window appear. Then go to the Roof components category. In the Components category select Top, from the Renders pull-down menu select RedSDK, from the Category pull-down menu select Shingles and finally select Shingles1 from the Marerial drop-down menu.


To scale the texture, press the Edit button, the Render Manager window opens. You now see the Shingles1 material highlighted. Select Texture below and enter the values ​​shown in the image below without touching the Shader and File name boxes


Click OK, and then click OK again in the Properties window. Here is your roof looking like a real roof !

note : The Roof tool is available on the Turbocad Deluxe, Turbocad Professional and Turbocad Pro Platinum versions. These 3 versions are available in free trial version and fully functional for 30 days :-). Click on the blue links to learn more about


To build the basic walls of this tutorial

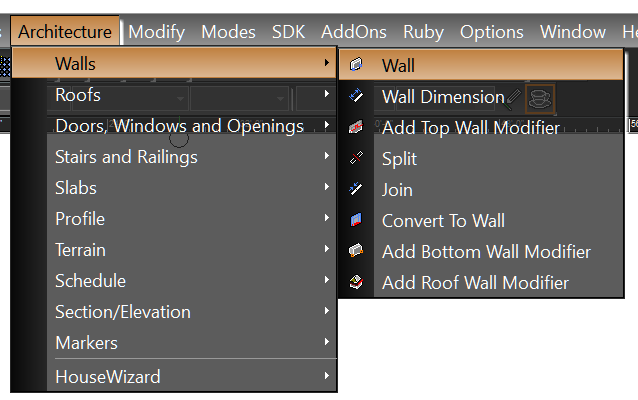
Select the Wall tool from the drop-down menu Architecture -- Walls -- Wall


Then make a right click on its icon, the Properties window appear. In the window go to the Wall category and make the following settings: Case Thickness: Enter 12 "or 305 if you are in metric system Case Height: Enter 96 "or 2438 if you are in metric system Case Reference : click left Then click OK.


Start drawing your walls at the bottom left of the drawing surface, enter the length and angle values ​​in the boxes at the bottom left of the Turbocad window and press the Enter key and continue In the same manner clockwise. When the third wall is completed, right-click and select the Close command to close the room


Voilà, it is as simple as that :-)

To learn more about the Walls, see my post at this adress : http://turbocad-coffre-outil-dao-cad-toolbox.blogspot.ca/2017/02/turbocad-wall-tool-simple-use.html

note : The Roof tool is available on the Turbocad Deluxe, Turbocad Professional and Turbocad Pro Platinum versions. These 3 versions are available in free trial version and fully functional for 30 days :-). Click on the blue links to learn more about

Wants more Turbocad tutorials, go to this adress

Jean
Turbocad affiliate

Turbocad, the Alternative

jeudi 23 février 2017

Turbocad - Toits (Roof) - Toiture simple

An ENGLISH version of this article is available at this adress

Toiture simple en 3D avec Turbocad


Plutôt que de dessiner la toiture de votre bâtiment manuellement, Turbocad vous propose d'automatiser cette tâche pour vous avec son outil "Roof" avec des résultats étonnants. Maintenant nous allons voir comment l'utiliser !


nb : l'outil Roof est disponible disponible sur les versions Turbocad Deluxe, Turbocad Professionnal et Turbocad Pro Platinum. Ces 3 versions sont disponibles en version d'essai Gratuite et pleinement fonctionnellles pour 30 jours :-)  Cliquez sur les liens internet en bleu pour en apprendre plus

Démarches à suivre pour réaliser cette toiture en 3D


Dans ce tutoriel nous utiliserons une pièce mesurant 40 pieds (12192mm) de longueur X 20 pieds (6096mm) de profondeur X 8 pieds (2438mm) de hauteur avec une épaisseur de mur de 12 pouces (305mm). Vous pouvez utiliser une tout autre dimension de pièce si vous le souhaitez. J'ai ajouté un tutoriel au bas de cette page pour construire ces murs en 3D


Tout d'abord nous devons déterminer le plan horizontal (Workplane) sur lequel nous allons déposer la partie basse (assise) de notre toiture. Pour ce faire sélectionnez l'outil Workplane -- By facet en appuyant simultanément sur les touches Majeur (flèche vers le haut) + Alt + F. Vous pouvez aussi le sélectionner en maintenant appuyer l'icone de la boîte d'outil Workplane (Plan de travail) dans le barre d'outil haute de Turbocad

nb : mettez vos murs d'une couleur autre que le noir afin de bien différencier ceux-ci de la toiture que nous ferons plus bas


Déplacer votre curseur sur le dessus d'un des murs, une ligne verte en surbrillance apparaît au dessus du mur. Faites un clique gauche. 


Vous êtes maintenant sur le bon plan de travail (Workplane). Pour vous en assurer, retourner dans la boîte à outils Workplane et appuyez sur l'icone Show/Hide WorkPlane. Un carré en pointillé rouge apparaît pour vous donnez l'orientation du plan de travail. 


Sélectionnez la vue frontale et vous voyez cette même ligne rouge mais cette fois-ci horizontale et située sur le dessus des murs


Revenez à une vue isométrique. Maintenant sélectionnez l'outil Roof (toit) à partir du menu déroulant Architecture -- Roofs -- Add Roof


Maintenant assurez-vous que le Snap mode Vertex est actif et cliquez sur les 4 coins extérieurs supérieurs de votre pièce. Une fois le quatrième coin a été cliqué faites un clic droit et sélectionnez la commande Finish (Alt + F)


Modifier l'angle de vision de votre bâtiment afin de bien la visualiser

Félicitations vous venez de créer votre première toiture en 3D avec l'outil Add Roof de Turbocad !


nb : l'outil Roof est disponible disponible sur les versions Turbocad Deluxe, Turbocad Professionnal et Turbocad Pro Platinum. Ces 3 versions sont disponibles en version d'essai Gratuite et pleinement fonctionnelles pour 30 jours :-)  Cliquez sur les liens internet en bleu pour en savoir plus !

Maintenant allons plus loin en modifiant les pentes des versants, ajoutez un débord de toit et un fascia

Modifier et ajouter des éléments à la toiture

Nous allons maintenant ajouter du volume à la toiture en lui ajoutant un débord de toit de 16 pouces (406mm). Sélectionnez la toiture, faites un clic droit dessus, la fenêtre Properties s'affiche, puis allez dans la catégorie Roof


Dans la case Overhang (débord de toit) inscrivez 16" ou 406 si vous êtes en système métrique puis cliquez sur OK. Le débord de toit apparaît


Pente de toit

Pour modifier la pente du toit, sélectionnez la toiture et faites un clique droit, la fenêtre Properties s'affiche. Sélectionnez Roof dans la case gauche de la fenêtre. Dans la case Slope (pente) inscrivez par exemple la valeur 30 pour 30 degrés. Cliquez sur OK pour afficher le résultat

Fascia


Ajoutez une épaisseur aux versants de la toiture ce qui fera foi de fascia de 8 pouces (200mm). 
Sélectionnez la toiture, faites un clic droit dessus, la fenêtre Properties s'affiche. puis allez dans la catégorie Roof


Dans la case Thickness (épaisseur) inscrivez 8" ou 200 si vous êtes en système métrique puis cliquez sur OK. Vous voyez apparaître le fascia de par l'épaisseur que vous venez d'ajouter à la toiture

Revêtement de toit


Notre toiture est un peu terne, ajoutons lui une texture de bardeaux d'asphalte. Sélectionnez la toiture, faites un clic droit dessus, la fenêtre Properties s'affiche. puis allez dans la catégorie Roof components. Dans la catégorie Components sélectionnez Top, dans le menu déroulant Renders sélectionnez RedSDK, dans le menu déroulant Category sélectionnez Shingles et finalement dans le menu déroulant Marerial sélectionnez Shingles1


Pour mettre la texture à l'échelle, appuyez sur le bouton Edit, la fenêtre Render Manager s'ouvre. Vous voyez maintenant le matériel Shingles1 en surbrillance. Sélectionnez Texture situé en dessous et entrez les valeurs affichés sur l'image ci-dessous sans toucher aux cases Shader et File name


Cliquez sur OK puis sur OK à nouveau dans la fenêtre Properties. Voilà votre toiture ayant l'air d'une vrai toiture !


nb : l'outil Roof est disponible disponible sur les versions Turbocad Deluxe, Turbocad Professionnal et Turbocad Pro Platinum. Ces 3 versions sont disponibles en version d'essai Gratuite et pleinement fonctionnelles pour 30 jours :-) Cliquez sur les liens internet en bleu pour en savoir plus

Pour construire les murs de base de ce tutoriel

Sélectionnez l'outil Wall à partir du menu déroulant Architecture -- Walls --Wall


Ensuite faite un clique droit sur son icone, la fenêtre Properties s'affiche. Dans la fenêtre allez dans la catégorie Wall et effectuez les réglages suivants :

Case Thickness : entrez 12" ou 305 si vous êtes en système métrique
Case Height : entrez 96" ou 2438 si vous êtes en système métrique
Case Reference cliquez sur left

Puis cliquez sur OK


Commencez à dessiner vos murs en bas à gauche de la surface de dessin, entrez les valeurs de longueur (lenght) et angle dans les cases complètement en bas à gauche de la fenêtre du logiciel Turbocad et appuyez sur la touche Entrée (Enter) puis continuez de la même façon en suivant le sens des aiguilles d'une montre. Lorsque le troisième mur est complété, faites un clique droit et sélectionnez la commande Close pour fermer la pièce

Voilà, c,est aussi simple que cela :-)

Pour en apprendre plus au sujet de l'outil Wall, allez à cette adresse : http://turbocad-coffre-outil-dao-cad-toolbox.blogspot.ca/2017/02/turbocad-outil-wall-mur-utilisation.html

nb : l'outil Roof est disponible disponible sur les versions Turbocad Deluxe, Turbocad Professionnal et Turbocad Pro PlatinumCes 3 versions sont disponibles en version d'essai Gratuite et pleinement fonctionnelles pour 30 jours :-) Cliquez sur les liens internet en bleu pour en savoir plus

Vous voulez plus de tutoriels de Turbocadcliquez ici

Jean
Affilié Turbocad

Turbocad, l'Alternatice valable


mercredi 3 août 2016

TurboCAD - Une commande ne fonctionne pas correctement - Placez vos objets sur le plan de travail courant


An ENGLISH version of this post is available at this adress

Une commande Turbocad ne fonctionne pas ou fonctionne partiellement? Pensez à placer les objets concernés sur le même plan de travail (Workplane) !


Parfois, une commande ne fonctionne pas ou ne fonctionne que partiellement et vous vous demandez "j'utilise cette commande correctement, mais je n'obtiens pas le résultat souhaité. Quel est le problème?". Souvent, les objets que vous utilisez pour exécuter cette commande ne sont pas sur le plan de travail actuel (Workplane) pour différentes raisons

** Cette astuce peut être appliquer sur d'autres logiciels de DAO (CAD). Vous devez trouver les noms de commandes correspondants


Pour être sûr que vos objets (lignes, arcs, cercles, polylignes, etc ...) sont sur le plan de travail actuel (Workplane), procédez comme suit:


  • Sélectionnez les objets qui seront utilisés pour exécuter la commande que vous souhaitez utiliser
  • Allez dans le menu Modify et sélectionnez la Place on Workplane (Shift + Alt + W)
De cette façon, tous les objets sélectionnés seront placer sur le plan de travail actuel (Workplane) et dans la plupart des cas, la commande va fonctionner correctement :-)

** Si le problème persiste, allez voir ce post sur le forum Turbocad


Une illustration des objets placés sur différents plans de travail (Workplanes)

Sur la figure ci-dessous (vue du dessus), le rectangle bleu clair représente le plan de travail initial. Le cercle et la ligne semblent être placé sur cette surface horizontale, mais si nous les regardons sur une vue de côté ...


nous pouvons voir qu'ils sont placés sur deux autres plans de travail horizontals (WorkPlane). Ici, j'ai beaucoup exagéré la situation, mais si les objets dont vous avez besoin pour exécuter une commande ne sont pas placés exactement sur le WorkPlane courant, ceci est suffisant pour que la commande ne fonctionne pas ou ne fonctionne que partiellement


Une vue en perspective des mêmes objets sur leurs différents plan de travail


Pourquoi les objets ne sont pas créés sur le bon plan de travail?


  • Il peut être causé par une erreur du logiciel
  • Cela peut être une mauvaise manipulation de votre part surtout en mode 3D ou ont change constamment de Plan de travail et que l'on oublie de vérifier le positionnement exact de notre plan de construction avant de créer un objet
  • Cela peut être causé lorsque vous effectuez une copie miroir ou lorsque vous changez l'angle de rotation d'un objet

Il y a probablement d'autres raisons qui me sont inconnues pour le moment. Si vous en connaissez d'autres, je vous serais reconnaissant de les partagez !

Cet article en est un travail en cours. Alors revenez souvent ou ajouter cette page à vos favoris :-)

Besoin de plus d'aide sur Turbocad, visitez ma page d'archives!


Jean Bernier
Service de plans JB
Affilié Turbocad affiliate

Turbocad, l'Alternative. Suivez ce lien pour en faire l'expérience
Turbocad, the valid Alternative. Follow this link to experience it !​