How to create Curtains with the Loft tool and Spline by Fit Points of Turbocad
It's much less work than making them to the sewing machine!
To follow this tutorial you can download the basic Turbocad file by clicking this link. Open it
Note : The Revolve tool is available with the Professionnal and PRO Platinum versions of Turbocad. These 2 versions are available in free trial and fully functional versions for 30 days :-) Click on the links in blue to learn more
You see just the basics objects and visuals Workplanes you'll need to do the curtains and the bands which holds them on the side. I placed others objects already did (pole, walls, moldings, door, ect...) on specific layers. Those layers are invisible. We'll make them visible during the tutorial
Procedure to create the curtains and the bands
- First I maded 3 horizontals Workplanes (top, middle, bottom)
- Creation of the horizontals shapes of the curtains with Spline by fit Points tool
- Creation of the curtains with the Loft tool
- Creation of the bands which hold the curtains on the side
Creation of the necessary Workplanes
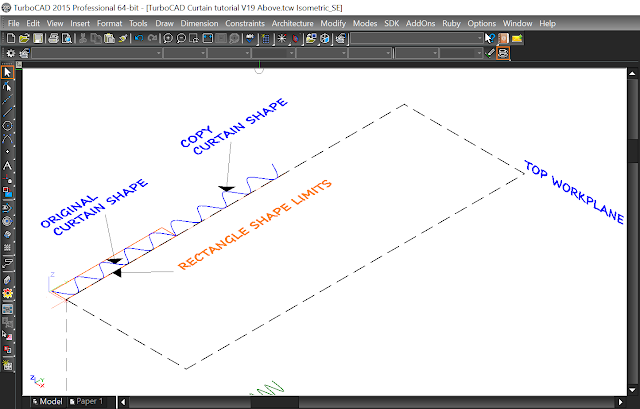
In this Curtains tutorial file,they're already maded. You can access them in using the Named Workplane by the Standard Toolbar or with the Design Director. It is easier to predetermine your Workplnes before to place differents curtains shapes at the right places. See the image aboveCreation of the horizontals shapes of the curtains
As you can see on the image below, I did a rectangle on the Top Workplane at the place I want to start the left curtain. To help me, I used the Divide snap mode with an 18 divisions setup and I selected the Vertex snap mode too to start the curtain shape. Now select the Spline by Fit Point tool from the Curve toolbar. Start your curtain shape with one of the corner of the rectangle and after draw the shape you want for your curtain.On the current workplane, Made a copy of the curtain shape and place it at the place you want, NOT A MIRROR COPY because it causes a display problem (transparencies parts on the curtains) and I don't know why. Rotate it if it's needed
Now make the Middle WorkPlane active. Select the 2 curtains shapes you just did, make a copy them and place them where you want on the Middle Workplane
Select the left curtain shape (middle one) and resize it as you wish and do the same thing with the right one
Repeat the previous steps but on the Bottom WorkPlane
Creation of the curtains with the Loft tool
You are now at the most interesting moment !Before to select the Loft tool, Right click and select Properties, in the 3D sub section make sure Solid is selected
Now select the Loft tool. After select the 3 formats of curtains shapes in this way to reproduce the curtains I did (you can try other ways to make other results) : the top one, the middle one and the bottom one. Right click and select the Finish command.
Voilà, congratulations you succeed your first Lofting. To see the render, choose the Render scene you want (Draft, Quality or Advanced Quality)
Now use the same procedure po made the right curtain. If you to see the result with the pole, walls and others objects you just have to turn on the appropriates layers
Note : The Revolve tool is available with the Professionnal and PRO Platinum versions of Turbocad. These 2 versions are available in free trial and fully functional versions for 30 days :-) Click on the links in blue to learn more
Want more Turbocad tutorials, click here


