dimanche 31 juillet 2016

Turbocad outil Trim - Couper multiples lignes en une seule action

An English version of this post is available in following this link

Comment couper de multiples lignes entre deux objets (lignes, courbes, polyligne, ect ...) dans Turbocad


J'ai rencontré ce problème en dessinant un agrandissement de chalet pour un client. J'étais bien sûr capable de couper une ligne à la fois avec l'outil Trim, mais je ne pouvais pas couper de nombreuses lignes à la fois comme changer la longueur de plusieurs lignes en une seule action avec l'outil multi Shrink / Extend ligne

Vous verrez dans ce tutoriel comment obtenir le résultat souhaité ! J'utilise l'édition Platinum de Turbocad mais vous pouvez aussi utilisez ce tutoriel avec les éditions Deluxe et Pro

Alors je me suis tourné vers la communauté d'aide de Turbocad pour  m'aider à résoudre ce problème et je ne l'ai pas regretté :-). Comme vous pouvez le voir dans ce post, plusieurs membres ont attaqué la tâche avec courtoisie et efficacité. Je vous invite à vous y joindre. Beaucoup de trucs et astuces sont disponibles et bien sûr de l'aide spécifique à vos besoins

Commençons à résoudre ce problème !

Tout d'abord aller dans le menu Modify et sélectionnez l'outil Trim. Si vous ne pouvez pas le voir, voir ci-dessous le chemin pour y accéder


Deuxième sélectionner en faisant glisser en bas à droite jusqu'en haut à gauche, les deux objets serviront de couteaux. Ensuite, cliquez sur le bouton Finish (Drapeau) ou faites un clic droit et sélectionnez Finish (Drapeau) ou la combinaison de touches Alt + F


Maintenant sélectionnez les lignes à couper


Voyez le résultat !


Trucs

Si ça ne fonctionne pas ou que partiellement, pensez à placer les lignes "Couteaux" et les lignes qui doivent être coupées sur le même plan de travail (Workplane). Pour ce faire, sélectionnez les deux types de lignes et allez dans le menu Modify et sélectionnez Place on Workplane (Shift+Alt+W)

Si vous ne pouvez pas voir l'outil Trim, allez dans le menu Tools, sélectionnez Customize, la boîte Customize s'ouvre. Allez à l'onglet Commands, défilez vers le bas la zone Commands jusqu'à ce que vous voyez l'outil Trim, sélectionnez-le et faites-le glisser dans une barre d'outils de l'interface utilisateur de Turbocad. Maintenant, vous pouvez exécuter ce tutoriel!


Vous voulez plus de tutoriels de Turbocadcliquez ici


Jean Bernier
Service de plans JB
Affilié Turbocad

Turbocad, l'Alternative. Suivez ce lien pour en faire l'expérience
Turbocad, the valid Alternative. Follow this link to experience it !

samedi 30 juillet 2016

Turbocad - LTE UI - Command line - Work more efficiently

La version en  FRANÇAIS de ce tutoriel est diaponible à cette adresse

LTE user inteface allowing you to work even more efficiently and quickly

Update 2017-04-21 --- Click on this link for a complete LTE command list 

Most Turbocad users use its default environment, me first :-) which includes intuitive drop-down menus and icons toolbars that provide a visual use just as intuitive tools. But there is another effective method if not more then Autocad users knows very well and that is the Command Line


Turbocad offers the opportunity to work using the keyboard controls to significantly improve your effectiveness working with the mouse-keyboard duo. This method is achieved by using the LTE user interface provided in your software that included the command line. This tutorial will show you how to access and use this UI


Let's get setup the LTE user interface in Turbocad !


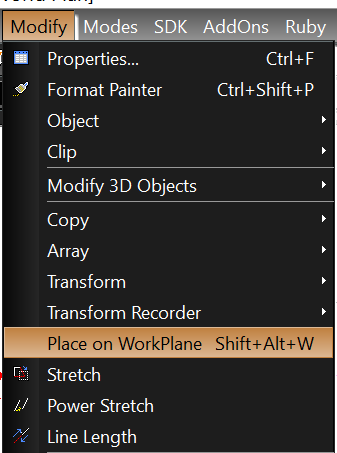
First, to change the user interface from the default to the LTE UI go to the Tools menu and select Customize


In the Customize Window, go to the Options tab then in "Workspace area" and select LTE Workspace in the Default style drop-down menu. Click on the Close button at the bottom of the window. Turbocad takes few moments to intitiate the LTE user interface


You're now in the LTE UI and you can see the Command line box at the bottom of Turbocad window. You are ready to use this powerfull tool !


Let's get start using the Command Line


We will use some basics commands like Line, Circle and rectangle but this UI is not limited to these commands you can use hundreds 2D/3D commands used in Autocad and some spefific to Turbocad

**For Autocad users, there's a more specific version of Turbocad for you.  This version is called Turbocad LTE Pro and it is designed specially to facilitate your transition to Turbocad. You can save your drawings directly in DWG file like others Turbocad version. You can learn more about at this adress

** This tutorial is a Work in progress one, please come visit regularly :-)

In this example we will draw a line 5 inches long with an angle of 30 degrees. First type in Command line box the letter "L" and press Enter. You can use metric system by writing mm (example) right after the new numeric value you entered or changing Space units. To do this go to Options menu --> Drawing setup --> Space units --> System --> Metric


The command line ask you to Define the Start point of the line. When you point the cursor in the drawing area it is asking the same thing


Define a position anywhere in the drawing area. Now two new boxes appear in the drawing area. It is asking to define the End point of the line. We will use the two boxes to define precisly the lenght and angle we want. By default the Lenght box is highlight and waiting you enter a value. Enter 5 in this case. Press the Tab key to enter the angle value 30 then press the Space bar or Enter key. Congratulations you just draw your first object in this new environnement :-)


You can observe then Turbocad asking you for a next End point from the one you just drew. It's because you're still in Line command until you exit it by pressing the Escape key. In this way you can draw multiples Lines always from the last End point like a Polyline without being

**When you are using the Command line interface, look in this one and you can choose differents options depending on what the tool you are using. I will writing on this subject later

Second example we will draw a rectangle with the same procedure. First write REC and hit Space bar or Enter key. Turbocad asking you to Define the first corner of the box. Do it by clicking anywhere in the drawing area

Now Turbocad asking to define the second corner of the box. Two boxes appear in drawing area, Size A(lenght) and Size B (height) to define the sizes of the box. In this case we will use 6 as the lenght and 3 as the height. By default the Size A box is highlight, so enter 6 as the lenght value, press the Tab key to enter the Size B box and enter 3 as the height value then press Space bar or Enter key to confirm the command. That's it, it's easy and fast like this and it's gonna be faster as and extent of your use !


**When you are using the Command line interface, look in this one and you can choose differents options depending on what the tool you are using. I will writing on this subject later

Third example, we will draw a circle with the same procedure. First write "C" and hit Space bar or Enter key. Turbocad asking you to Define the center point of the circle. Do it by clicking anywhere in the drawing area

Turbocad asking to Define point to specify radius of circle. In this case we will enter a value in the new box appear "Radius". Enter 3 as the Radius of the circle and hit the Space bar or the Enter key to confirm the command. That's another way to draw a circle in Turbocad. Instead of a numeric values, you can of course use the cursor to determine a free value.


**When you are using the Command line interface, look in this one and you can choose differents options depending on what the tool you are using. I will writing on this subject later

Others basic commands

I'm letting you try others commands among others :

PLINE to draw a polyline
ARC to draw an arc
ZOOM to increase or decrease the apparent sizes of objects

You want more for sure, see this web page !

Snap modes are accessible by right clicking in a free space on the drawing area and choose Local snap and select the desired mode


As mentionned above this tutorial will be improve in next weeks !


Have fun with LTE UI !

Wants more Turbocad tutorials, go to this adress

You want to learn more about versions of Turbocad, follow this linK

Jean Bernier
Turbocad user and affiliate


mardi 26 juillet 2016

Turbocad Trim tool - Cut multiples lines in one action

How to cut multiples lines between two objetcs (line, curve, polyline, ect...) in Turbocad

Une version en français de cet article est disponible ICI

I met this problem by drawing a chalet expansion for a client. I was of course able to cut a line at a time with the Trim tool, but I could not cut off many lines at a time like changing the length of several lines in one action with the tool Multi Shrink / Extend line


You will see in this tutorial how to achieve the desired result! I'm using Turbocad Platinum edition but you use this tutorial for the Deluxe and Pro edition too

So I turned to the Turbocad aid community to help me solve this problem and I have not regretted :-). As you can see in this post, several members attacked the task efficiently and courteously. I invit you to join it. A lot of tips and tricks are available and of course spefific help from the community

Let's get start to solve the problem !


First go to the Modify menu and select the Trim tool. If you can't see it, see the tip below


Second select by draging (buttom right to up left) the two objects will serve as Cutters (knifes). Then click on the Finish (Flag) button or right click ans select Finish or the key combination Alt+F


Now select by dragging the lines to be Trim


And see the Result !


Tips


If it dosesn't work or just partially, think to place the Cutters lines and lines to be Trim on the same Workplane. To do this, select the both types of lines and go to the Modify menu ans select Place on the WorkPlane

If you can't see the Trim tool in Modify menu, go to the Tools menu, select Customize the Customize box open. Go to Commands tab, scroll down in the Commands box til to see the Trim tool, select it and drag it any toolbar on the Turbocad user interface. Now you can execute this tutorial !

Wants more Turbocad tutorials, go to this adress

Thanks


Thank you to the members of the Turbocad forum. A special thanks to Torfinn who give us this tip

Have a great day

Jean Bernier
Service de plans JB
Turbocad, l'Alternative. Suivez ce lien pour en faire l'expérience
Turbocad, the valid Alternative. Follow this link to experience it !

dimanche 24 juillet 2016

Turbocad - Multi Shrink / Extend line is not working properly

Multi Shrink / Extend line is not working or only partially ?

If you happen to select multiple lines you want to extend to a target object ( line, curve , polyline , ect ... ) and that any or all of these lines do not extend themselves as you wish, then this tutorial is for you. It aims to fix this

Une version en FRANÇAIS de cet article est disponible à cette adresse


The software that I use for this tutorial is Turbocad in its 2015 version, but the solution can be applied equally well in other CAD software


 So let's get started !

You may notice that the command will not work in whole or in part before his final run when you select the lines  to be extend . Then you notice that one or more lines have no end point


First deselect all the objects there select


To fix this we will put all the objects that will be used on the same WorkPlane. Now select the lines you want to lenghten and the target object, for this tutorial will be the " target Rectangle" , which will limit lines lengthen


 Then for Turbocad users, go to the Modify menu and click on the command Place on WorkPlane (Shift + Alt + W). If you are using another CAD software , find the command that put the objects on your current work plan


Uncheck select lines and other objects
 

Repeat the command Multi Shrink / Extend line , select the lines to extend and complete the order by clicking on the object that will limit these same lines


Voilà ! you just solve your problem ! In rare cases it may be that you have to repeat this process a second time


What could cause such a problem?

This can be a mistake object manipulation at creation , moving objects on different  WorkPlane or running a software error


If you have other causes and want to share them with the community please forward them to me or add a comment to this article

Wants more Turbocad tutorials, go to this adress


Thank you for your visit and good day!

Jean

Turbocad - Multi shrink/Extend line ne fonctionne pas correctement

An ENGLISH version of this tutorial is available at this adress

Multi shrink/Extend line ne fonctionne pas ou en partie seulement


S'il vous arrive de sélectionner plusieurs lignes que vous voulez allonger ou raccourcir jusqu'à un objet cible (ligne, courbe, poly ligne, ect...) et que une ou toutes ces lignes ne s'allongent ou ne se raccourssissent pas tel que vous le souhaitez, alors ce tutoriel est pour vous. Il vise à corriger ce problème de façon rapide et efficace


Le logiciel que j'utilise pour ce tutoriel est Turbocad dans sa version 2015 mais la solution peut s'appliquer tout aussi bien dans d'autres logiciels de DAO (CAD)


Alors débutons maintenant !

Vous pouvez remarquez que la commande ne fonctionnera pas en tout ou en partie avant même son exécution finale lorsque vous sélectionnez les lignes à allonger. Vous remarquez alors qu'une ou plusieurs lignes n'ont pas de Point final (End point)


Premièrement désélectionnez tout les objets s'il y en a de sélectionner

Pour solutionner ce problème nous allons remettre tout les objets qui seront utilisés sur le même plan de travail (WorkPlane). Maintenant sélectionnez les lignes que vous voulez allonger et l'objet cible, pour ce tutoriel ce sera le "Rectangle cible", qui servira de limites aux lignes à allonger


Ensuite, pour les utlisateurs de Turbocad, rendez-vous dans le menu Modify et cliquez sur la commande Place on WorkPlane (Shift+Alt+W). Si vous utilisez un autre logiciel de DAO, trouvez la commande qui placent les objets sur votre plan de travail actuel


Désélectionnez les lignes et autres objets sélectionnez

Refaites la commande Multi shrink/Extend line, sélectionnez les lignes à allonger et terminer la commande en cliquant sur l'objet qui servira de limites à ces mêmes lignes


Voilà vous venez de résoudre votre problème ! Dans de rares cas il se peut que vous ayez à refaire cette démarche une deuxième fois


Qu'est-ce qui peut causer un tel problème ?

Ce peut être une erreur de manipulation d'objet lors de leur création, le déplacement d'objet sur différents plan de travail (WorkPlane) ou une erreur d'exécution du logiciel

Si vous avez d'autres causes et voulez les partagez avec la communauté n'hésitez pas à me les transmettre ou ajoutez un commentaire à cet article


Vous voulez plus de tutoriels de Turbocadcliquez ici

Merci de votre visite et bonne journée !

Turbocad, l'Alternative valide
Turbocad, the valid Alternative

Jean

samedi 23 juillet 2016

Turbocad - Fuzzy buttons (icons)

Une version en FRANÇAIS de cet article est disponible à cette adresse

How to fix this fuzzy problem


Go to the Tools menu than Workspace and press UI Theme.


Change the theme in clicking on it and the press Close at the buttom of the window


Go to the Tools menu than Workspace and press Customize


Change the Button size with the slider at the center of this Window. Close the with the Close button


If the problem is sloved, you can continue with this theme or switch back to your favorite theme in following the above procedure

If the problem still there, Save your work, Close Turbocad and restart it. The problem will be solve
That's it !

If you want to know more about Turbocad products, Follow this link

Wants more Turbocad tutorials, go to this adress

Have a great day !

Turbocad, the valid Alternative
Experience it in Full version for free during a mounth

Jean Bernier

Turbocad - Boutons (icones) flous ?


An ENGLISH version of this article is available at this adress

Voici comment résoudre le problème des icones flous sur Turbocad

 
Allez dans le menu Tools ensuite appuyez sur Workspace et finalement sur UI Theme


Changez le Theme "User Interface style" en cliquant sur celui désiré et fermez la fenêtre en appuyant sur le bouton Close au bas de la fenêtre

Maintenant allez dans le menu Tools ensuite sur Workspace et finalement sur Customize


Changez la dimension des boutons en déplaçant le curseur situé au centre de la fenêtre sous la rubrique Other. Fermes la fenêtre avec le bouton Close


Si le problème est résolu, vous avez le choix entre garder le thème actuel ou revenir à votre thème préféré en suivant la procédure ci dessus

Si le problème persiste, sauvegardez votre travail, fermez Turbocad et redémarrez le

C'est tout, normalement tout devrait revenir dans l'ordre

Si vous voulez en savoir plus sur les produits Turbocad, suivez ce lien

Bonne journée !


Vous voulez plus de tutoriels de Turbocadcliquez ici

Turbocad, l'Alternative valable

Expérimentez le gratuitement dans sa pleine version pendant 1 mois


Jean Bernier

Affilié IMSI Design

vendredi 22 juillet 2016

Polylignes distorsionnées - Polylines distorted

Polylignes distorsionnées - Polylines distorted

Noir : en Français   Green : in English

Vous obtenez une polyligne comme celle de gauche....  ?     alors que vous voulez qu'elle soit comme celle de droite !

You get a Polyline like the left one.....?         as you want it like the right one !


Cet article est pour vous !   This article is writing for you !

Applicable pour Turbocad version Deluxe, Pro et Platinum. Applicable aussi pour certains autres logiciels de DAO

Relevant for Turbocad version Deluxe, Pro and Platinum. Relevant too for others CAD programs


Marche à suivre pour corriger ce problème :  

Follow this procedure to fix this problem

- Premièrement revenez à la forme souhaitée, faites un CTRL + Z au besoin          

- First back to the desired shape, do a CTRL + Z as required

- Deuxièment, sélectionnez tous les éléments composant la futur Poliligne           

- Second, select the objects included in the future Polyline


- Troisièmement, allez dans le menu Modify et sélectionnez Place on Workplane ou faites la combinaison de touches Shift + Alt + W

- Third, go to Modify menu and select Place on Workplane or do the key combination Shift + Alt + W


- Quatrièmement, déselectionnez les objets et refaites la commande Join Polyline du menu Modify. Sélectionnez les objets qui formeront la Polyligne

- Fourth, unselect the objects and do the Join Polyline command from the Modify menu again. Select the objects that form the Polyline


- Cinquièmement, cliquez la commande Finish (petit drapeau) au bas de l'écran ou par le bouton droit de la souris ou la combinaison de touches Alt + F

- Fifth, click the Finish command ( little flag ) at the bottom of the screen or the right mouse button or Alt + F keys


Voilà, vous avez réussis à résoudre ce problème :-) Notez il se peut dans de rare cas que vous ayez à refaire cette procédure une deuxième fois

Voilà , you have managed to solve this problem :-) Note it may, in rare cases, you have to repeat this process a second time

La cause de ce problème ? Celui-ci survient lorsque les objets concernés ont été manipulés de différentes façons (Mirror, rotation, ect...) et se retrouvent, une fois manipulée, légèrement en dessous ou au dessus du plan de travail (Workplane) et par conséquent provoque la distorsion. Ce problème se retrouve dans la plupart des logiciels de dessin assisté par ordinateur (DAO)

The cause of this problem? This occurs when the objects concerned have been handled in different ways ( Mirror, rotation , etc ... ) and find themselves , once handled, slightly below or above the worktop ( WorkPlane ) and therefore causes distortion. This problem is found in most  computer aided design (CAD)


Vous voulez plus de tutoriels de Turbocadcliquez ici
Wants more Turbocad tutorials, go to this adress


Bonne journée !    Have a great day !


Jean Bernier

Service de plans JB

Affilié Turbocad Affiliate

Turbocad, l'Alternative valide
Turbocad, the valid Alternative